Configuring your application
Much like the Linux kernel, Zephyr allows its users to configure the kernel/application at build time through the usage of the Kconfig-based configuration system. This can be used to, for example, enable optional features.
Interactive configuration
Users can choose to configure their application interactively, through the
usage of the menuconfig interface.
Opening the menuconfig interface
To open up the menuconfig interface, you’ll first have to build your
application. For example, assuming we want to configure the pixy2 sample,
based on the How to build section, we’d first have to run:
west build -p -b frdm_imx93//a55 samples/pixy2 -D DTC_OVERLAY_FILE=frdm_imx93.overlay
If the compilation was successful, the project tree should now contain a new
directory called build. With this, you can now open the menuconfig
interface by running:
ninja -C build menuconfig
If all went well, you should now be greeted by an interface similar to the one shown in Figure 34.
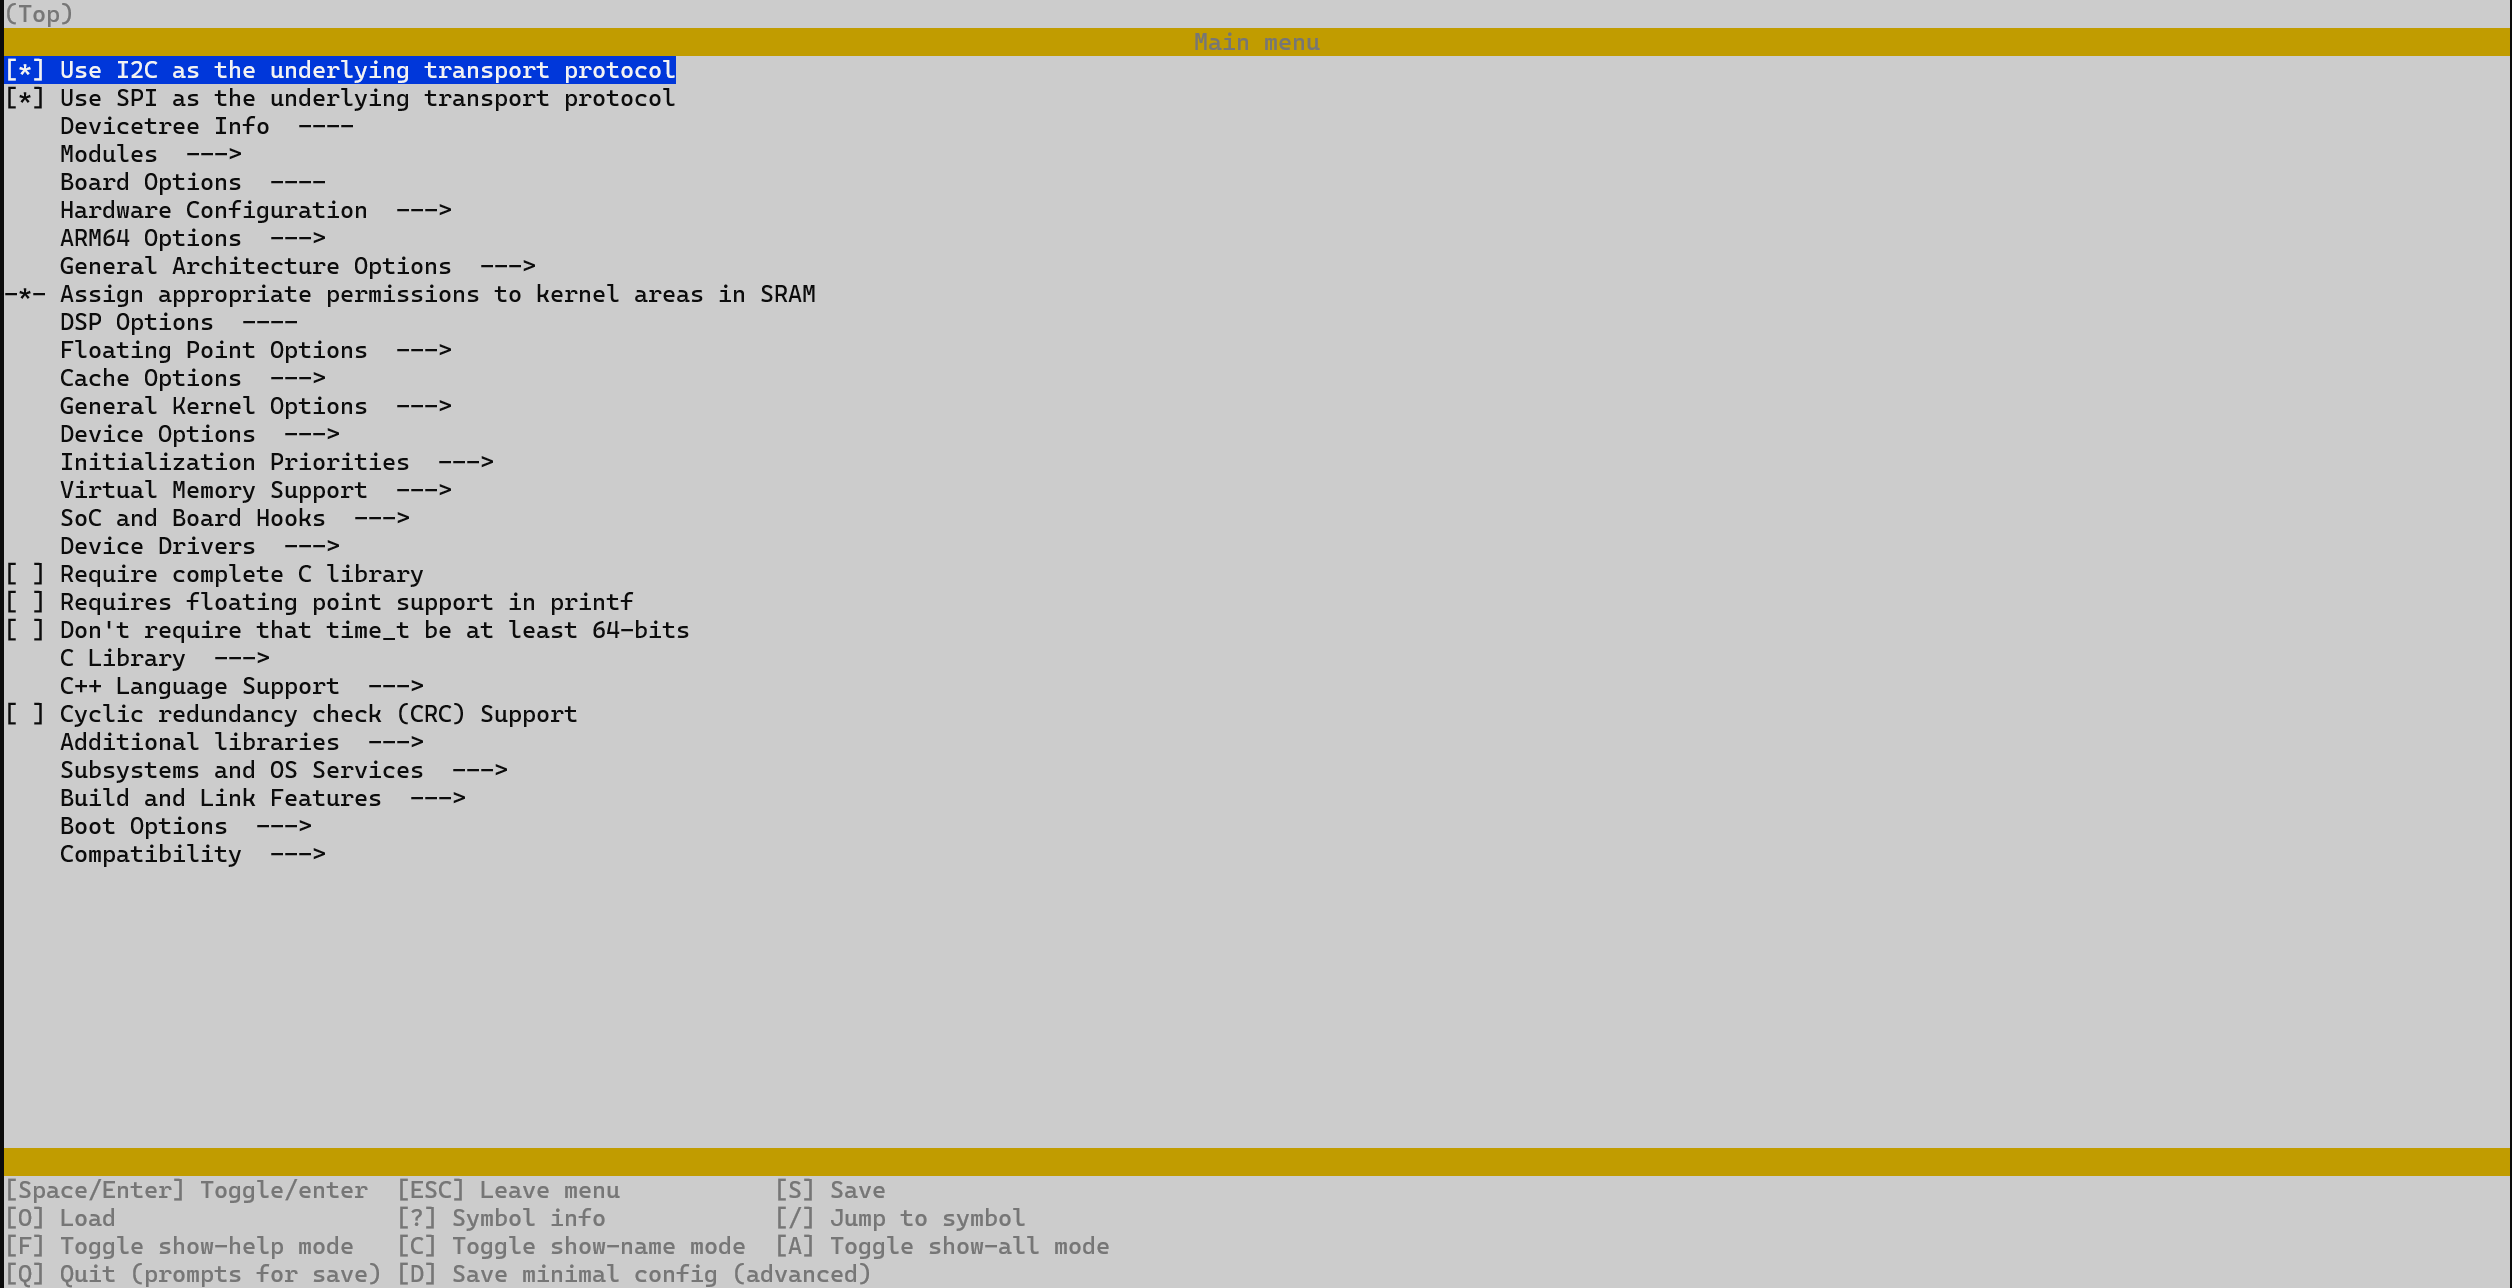
Figure 34 Menuconfig interface
Navigating through the menuconfig interface
To navigate between the different entries, you can use the up and down arrow keys. The currently selected item is highlighted in blue as shown in Figure 34.
To exit the interface you can use the Q key (capital letter).
To close the current menu and go back to the previous one, you can use
the ESC key. Pressing the ESC key while in the main menu (shown
in Figure 34) will result in exiting the interface.
To save your current settings, you can use the S key (capital letter).
Doing so will result in a prompt similar to the one shown in
Figure 35 appearing. Once you see this prompt, you’ll
need to press the ENTER key twice to confirm.
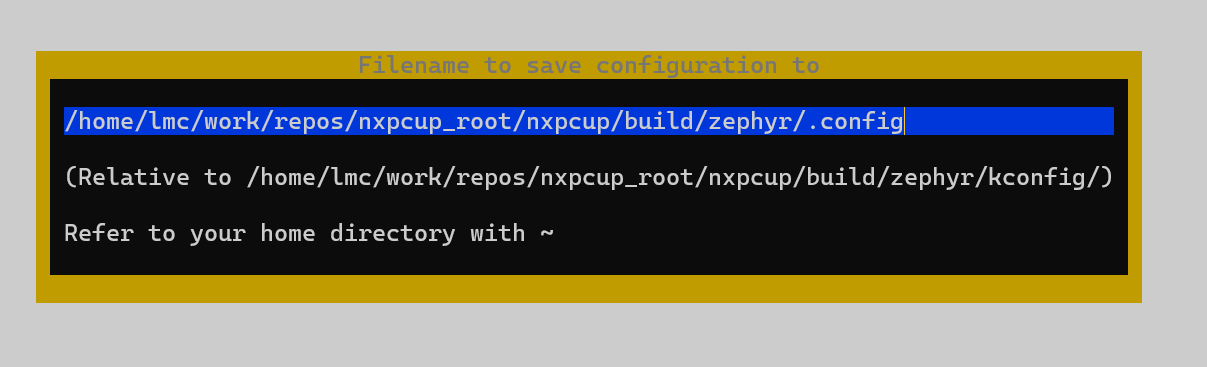
Figure 35 Menuconfig save prompt
Alternatively, if you’re done with the configuration process, you can
directly close the menuconfig interface (via the Q or ESC keys).
If you’ve made any changes, menuconfig will ask you if you want to
save your changes before quitting via a prompt similar to the one shown
in Figure 36.
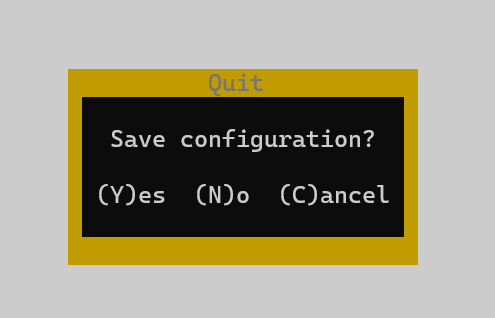
Figure 36 Menuconfig save prompt before quitting
Pressing Y (capital letter) will result in menuconfig saving your
changes and then closing.
Searching for configuration options
If you’re interested in looking for a particular configuration option,
you can use the search interface, which can be accessed by pressing the
/ key. Once open (see Figure 37), you can now type
in the name of your configuration option.
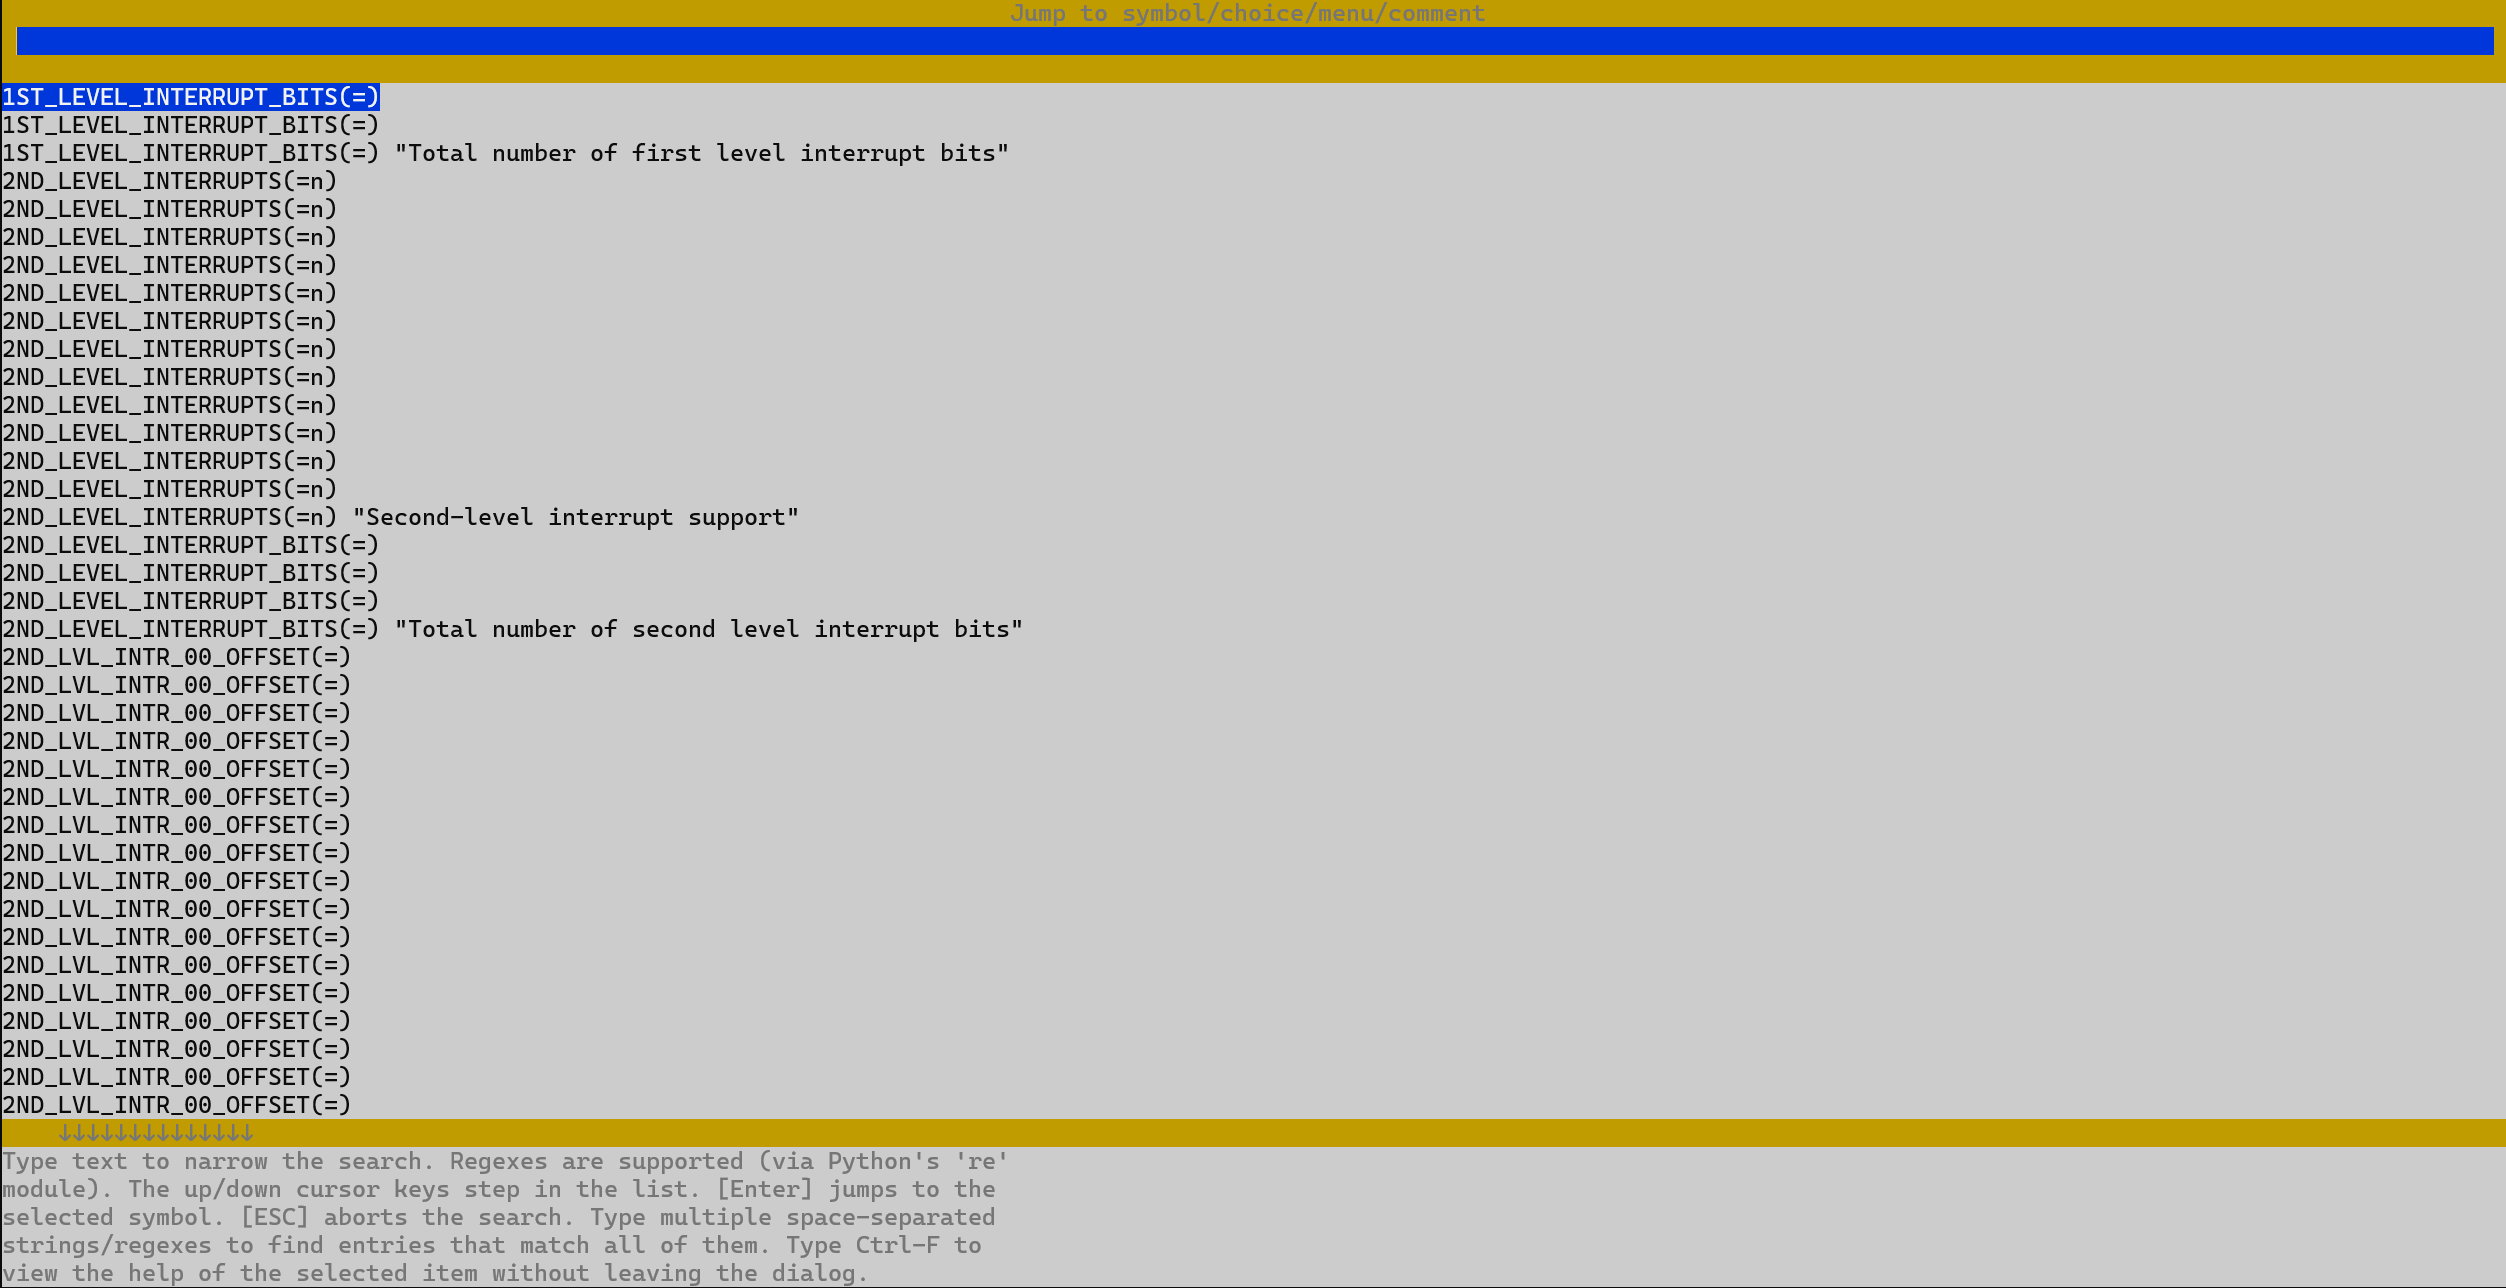
Figure 37 Menuconfig search interface
The name of the configuration option you type in must not contain
the CONFIG_ prefix. For example, assuming we’re interested in
looking for the CONFIG_CLOCK_CONTROL_INIT_PRIORITY option, we’d
simply type in CLOCK_CONTROL_INIT_PRIORITY as shown in
Figure 38.
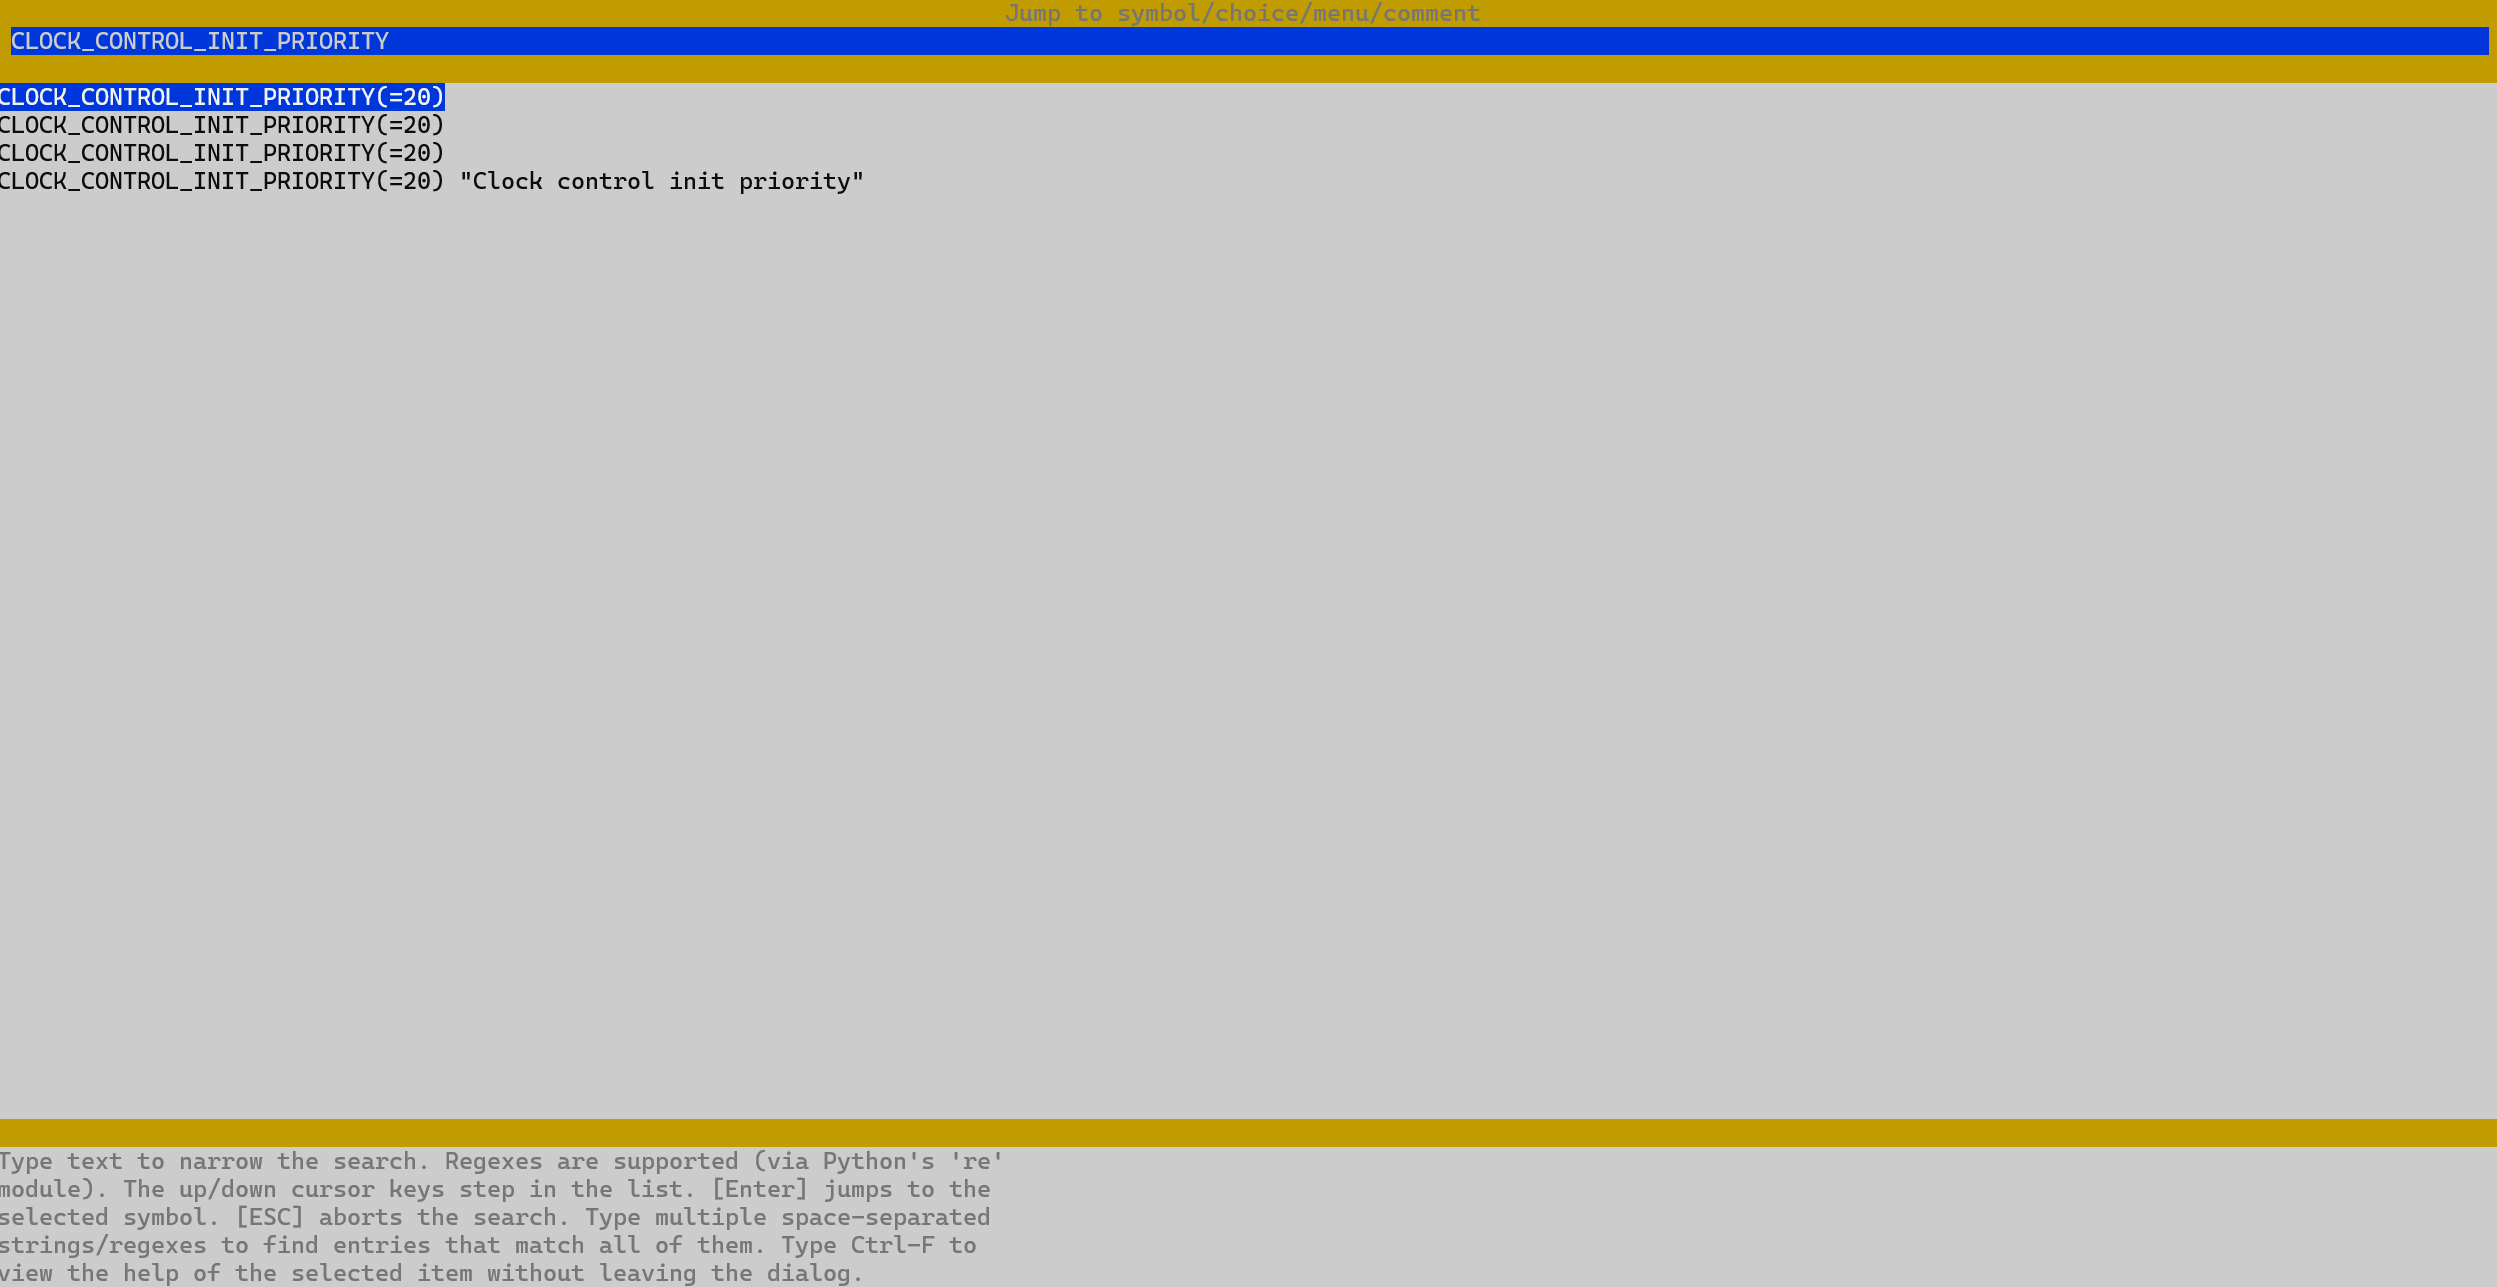
Figure 38 Menuconfig search example
We can then use the up and down arrow keys to navigate through the search results.
Printing help information
Sometimes the menuconfig entries are not descriptive enough and you
might require additional information (such as the name of the associated
configuration option, its type, etc..). In such cases, you can use the
? key to print help information on the currently selected entry
(highlighted in blue as shown in Figure 34). For example,
Figure 39 shows the help infromation printed for the
entry highlighted in Figure 34.
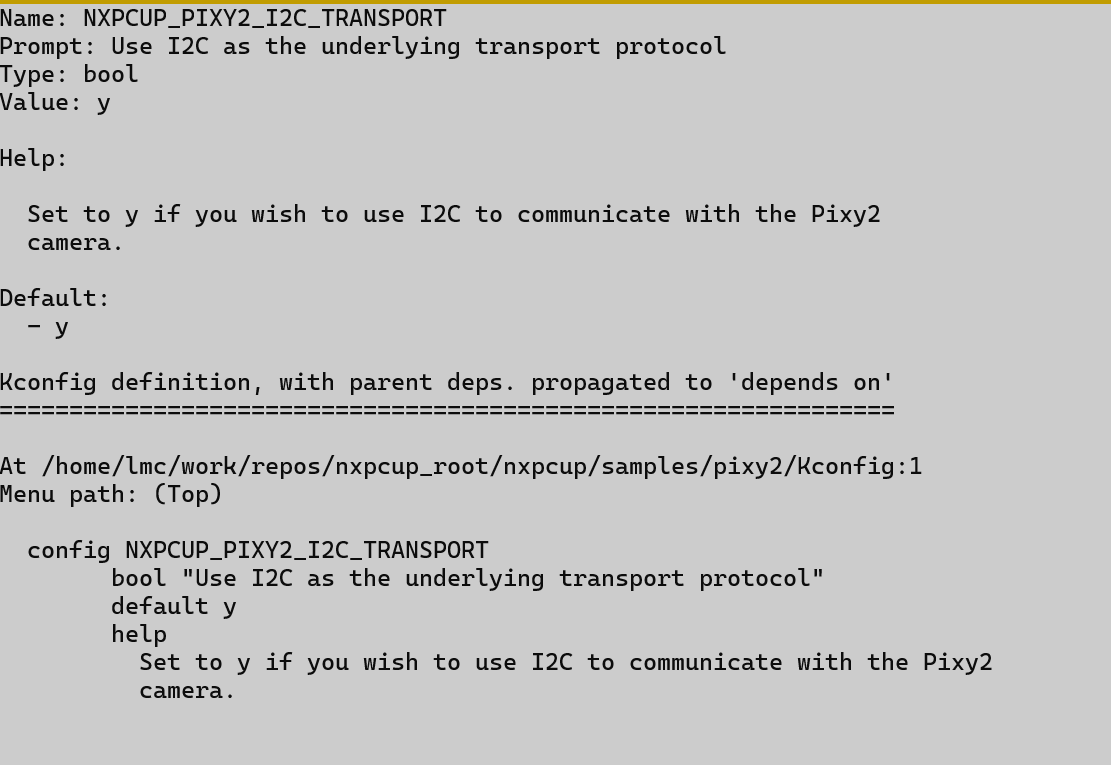
Figure 39 Menuconfig help
If you want to close the help menu, you can just press the ESC key.
Menuconfig entries
The menuconfig interface is made up of several prompts (or entries), each
of which offering a very brief description for a configuration option or a menu.
For example, looking at Figure 34, we can identify the following
prompts:
Use I2C as the underlying transport protocol
Use SPI as the underlying transport protocol
Devicetree Info
Modules
and so on and so forth. Based on the underlying type (i.e. a configuration option or a menu), these prompts will also contain some additional symbols. For example:
The Use I2C as the underlying transport protocol prompt has the
[*]symbol in the beginning.The Use SPI as the underlying transport protocol prompt has the
[*]symbol in the beginning.The Devicetree Info prompt has the
----symbol after it.The Modules prompt has the
--->symbol after it.
and so on and so forth. Generally, the ---- and ---> symbols will be
used to identify menus, while the rest will be used for configuration options.
You can think of a menu as a way to group configuration options based on
subsystem, functionality, etc.., but keep in mind that menus can also contain
other menus and not just configuration options.
Menus
As for the menu-related symbols, ---> is used to identify selectable
menus, while the ---- symbol is used for non-selectable menus. You’ll
most likely want to ignore menus marked with the ---- symbol.
To open up a menu, you’ll first have to select it using the up and down
arrow keys and then press the ENTER key. If the menu is not selectable
(i.e. it is marked with the ---- symbol), pressing the ENTER key
will not do anything.
For example, assuming we want to open the ARM64 Options menu, we’ll first have to navigate to it as shown in Figure 40.
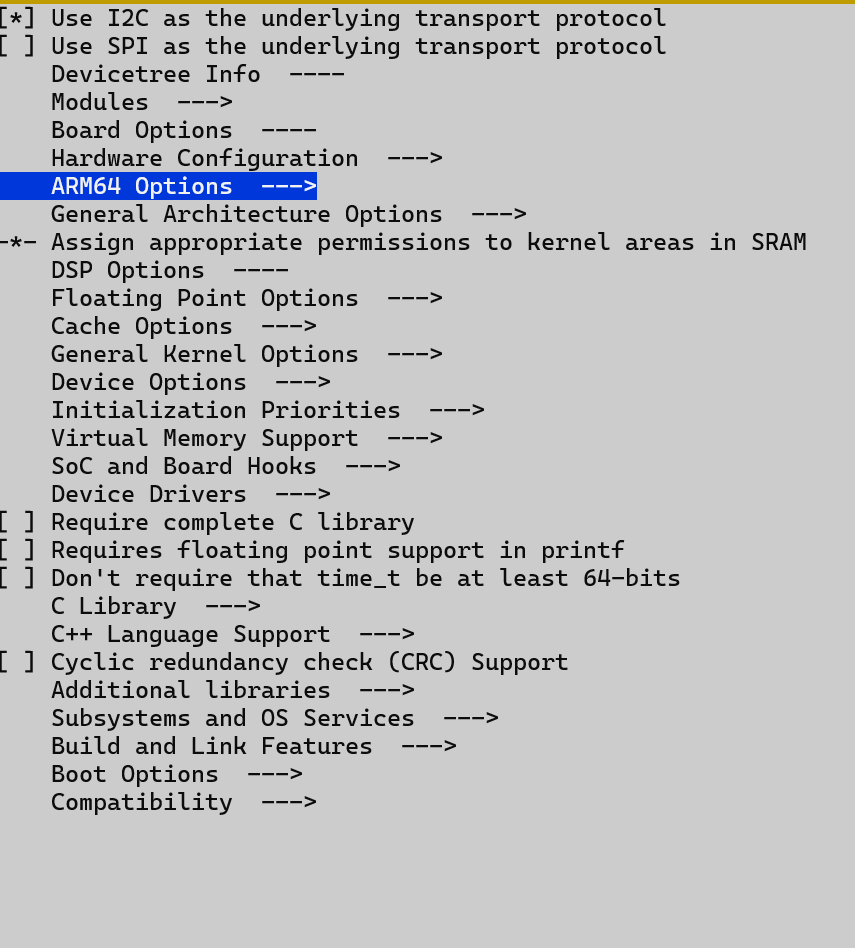
Figure 40 Navigating to the ARM64 Options menu
And then we can open it by pressing the ENTER key. This will result in
the menu shown in Figure 41.
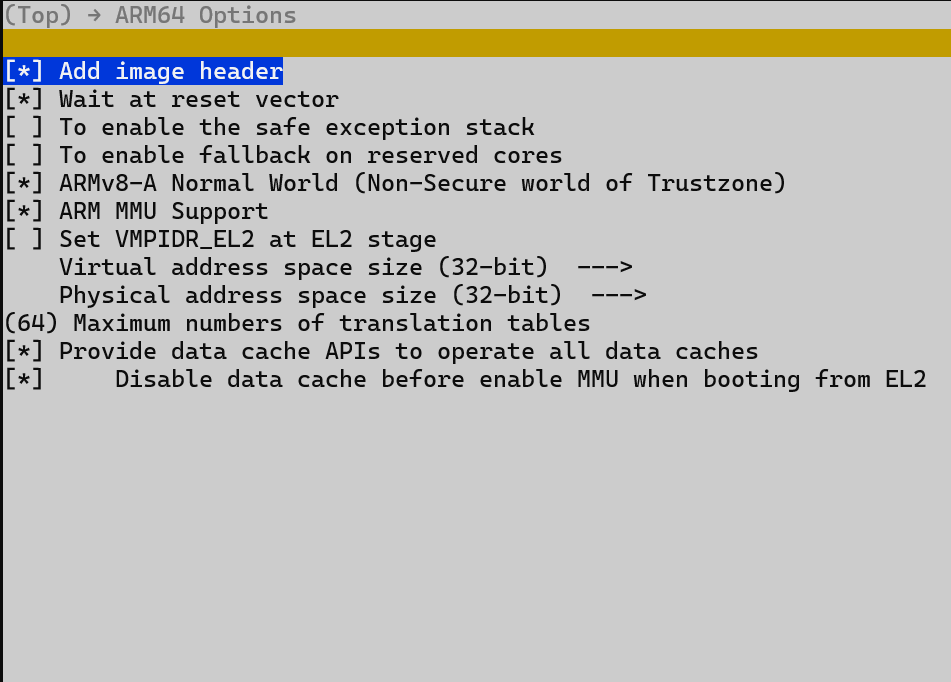
Figure 41 Opening the ARM64 Options menu
Configuration options
All configuration options have a name, a type, and a value. If you’re working
with C, cmake, etc.. (roughly, anything that’s not Kconfig), the name of the
configuration options will always contain the CONFIG_ prefix. For instance:
CONFIG_NXPCUP_PIXY2_I2C_TRANSPORTCONFIG_NXPCUP_PIXY2_SPI_TRANSPORTCONFIG_REQUIRES_FULL_LIBC
and so on. If however, you’re working with Kconfig, you’re going to have to
drop the CONFIG_ prefix if you, for example, want to search for the option
using menuconfig.
As for the config option type, you’ll most likely be working with just two
of them: boolean and integer. The boolean type (also known as just bool)
takes yes (y) or no (n) as values, while, intuitively, the integer
(also known as just int) type takes integers as value (e.g. 100, -5, 4, 56, etc..).
You can find the type of an underlying configuration option by either looking at the symbol that’s added before the prompt:
[]for boolean options()for integer options
or by opening the help menu as showcased in Printing help information and looking at the Type field.
Just like the ---- symbol that’s used for menus, configuration options
have the -- symbol which is used to mark configs that are not modifiable
(i.e. you can’t set a value to it).
Modifying a configuration option
To modify the value of a configuration option, you’ll first have to select
it using the up and down arrow keys and then press ENTER. Based on the
type of the option, you’ll see the following actions happening:
For boolean types, you’ll see an asterisk appearing/disappearing inside the
[]symbol. A[*]symbol means the config was assigned the valuey(yes), while a[ ]symbol means the config was assigned the valuen.For integer types, you’ll be prompted to enter the new value as shown in Figure 42. Once done, make sure you press
ENTER.
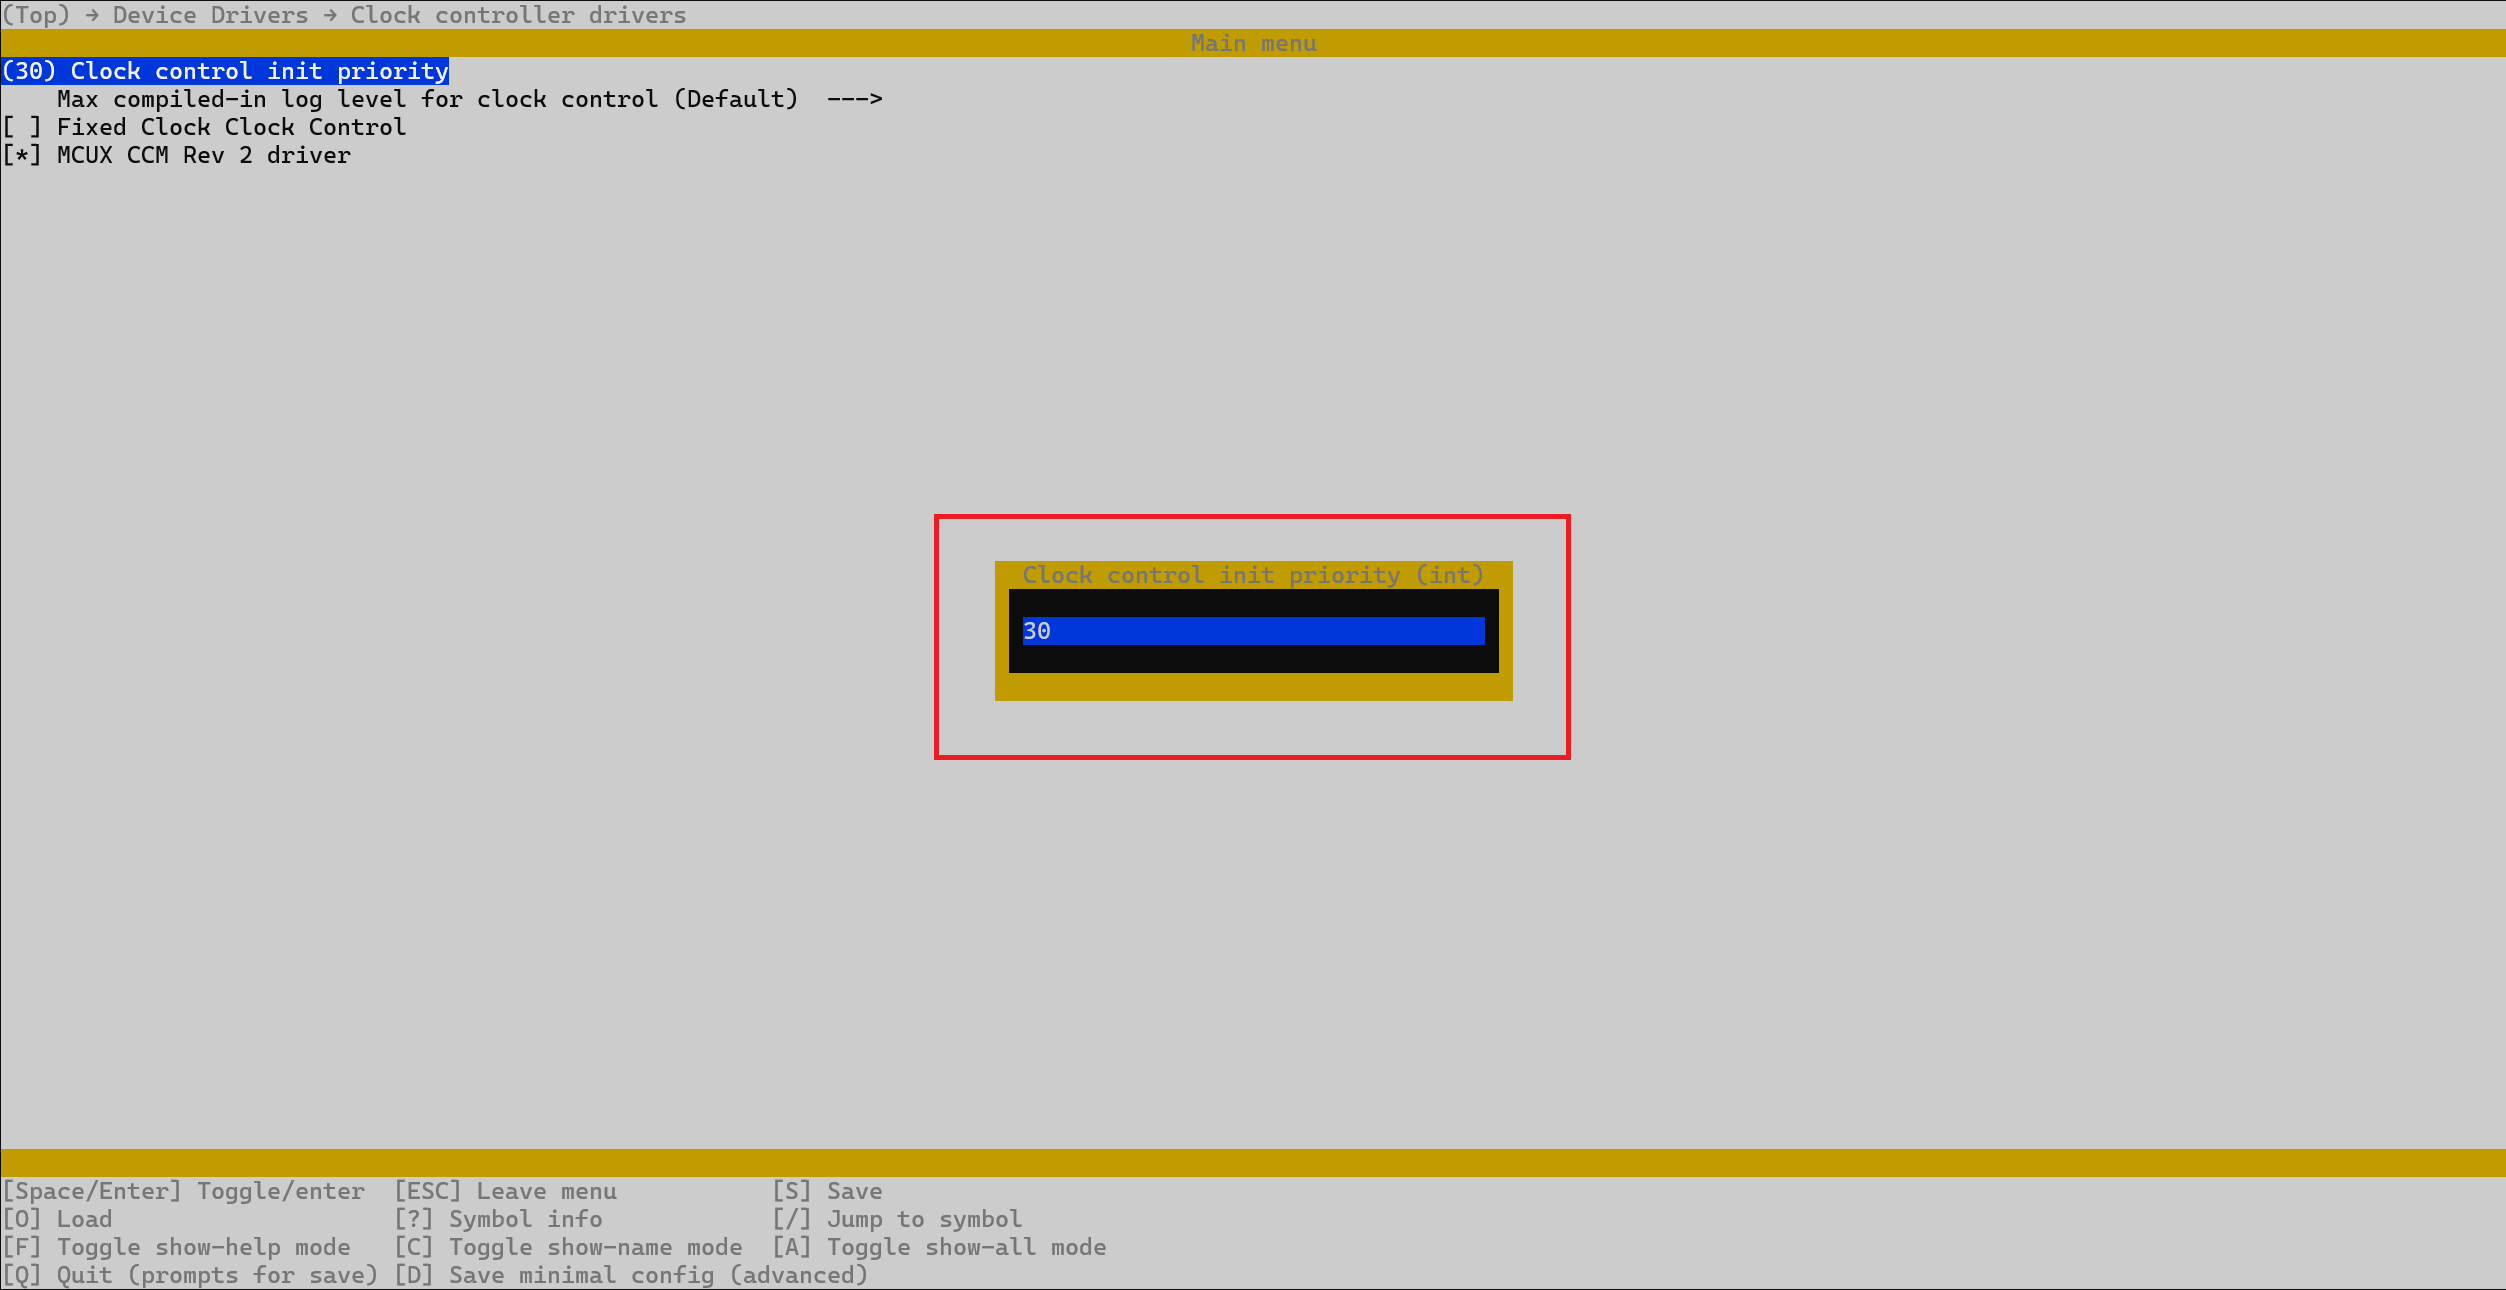
Figure 42 Setting an integer configuration option
When you’re done changing the value of your config, make sure to save your choices as detailed in Navigating through the menuconfig interface.
Once you’re done with everything, you can close the menuconfig
interface and re-compile your application.
Warning
The configuration performed through menuconfig is not persistent,
meaning you’ll lose all changes if you compile the application using
the -p flag.
Therefore, if you choose this method, you should omit the -p flag
after performing the changes through menuconfig.
Using configuration options in your C code
During the build process, Zephyr will generate an autoconf.h header
file with the definitions of the configuration options and their values.
If you inspect this file (which you should be able to find under
build/zephyr/include/generated/zephyr/autoconf.h), you’ll notice that
each configuration option is defined as a macro. For boolean types, if the
config was assigned the value y, the associated macro will be defined
and will expand to the value 1. For instance:
/* if NXPCUP_PIXY2_I2C_TRANSPORT is set to n, this config will not be defined at all! */
#define CONFIG_NXPCUP_PIXY2_I2C_TRANSPORT 1
On the other hand, if the config is assigned the value n, the associated
macro will not be defined at all. The example below shows you how you can
test if a config was assigned the value y and perform actions based on
that:
int main(void) {
#ifdef CONFIG_NXPCUP_PIXY2_I2C_TRANSPORT
   LOG_INF("Hello, world!");
#else
   LOG_INF("Goodbye, world!");
#endif /* CONFIG_NXPCUP_PIXY2_I2C_TRANSPORT */
   return 0;
}
If CONFIG_NXPCUP_PIXY2_I2C_TRANSPORT is set to y, your application
will print the Hello, world! message. Otherwise, it will print the
Goodbye, world! message.
For integer types, the associated macro should always be defined and will expand to the configured value.
Non-interactive configuration
Note
While you’re still getting used to the development environment, we recommend using this method instead of the interactive configuration as it should be less prone to errors/mistakes.
As discussed in Menuconfig entries, the configuration performed through
menuconfig is not persistent. To overcome this, you can opt for the
non-interactive configuration option, which makes use of the prj.conf file.
Each Zephyr application must have a prj.conf file, even if it’s empty. In
the context of this project, each sample application has the prj.conf file
stored under samples/<sample_name>/prj.conf, while the starting point for
your application has it stored under src/prj.conf.
The prj.conf file is made up of multiple entries, each of which with the
following format:
<config_name>=<value>
where:
config_name: name of the configuration option to modify. The name must contain theCONFIG_prefix. For example:CONFIG_NXPCUP_PIXY2_SPI_TRANSPORT.value: value to assign to the config
Therefore, setting the value of a config option is as simple as adding a new
line to the prj.conf file. For example, assuming we want to set
CONFIG_NXPCUP_PIXY2_SPI_TRANSPORT to y for the pixy2 sample, we’d
have to add the following line to samples/pixy2/prj.conf:
CONFIG_NXPCUP_PIXY2_SPI_TRANSPORT=y
After modifying the prj.conf file, you can re-compile the application as
you normally would (using the -p flag). You also have the option of verifying
if you configuration was saved by opening up menuconfig and looking at
the value that was assigned to your config (needs to be done after the re-compilation).