Preparing the environment (Windows)
This page describes the steps required for setting up the development infrastructure on a Windows-based machine.
Warning
This setup is currently experimental and was only tested using a machine running Windows 11 natively (i.e. no virtualization).
This guide assumes you’re using PowerShell [1]. Therefore, all of the
commands presented below are issued inside a PowerShell terminal.
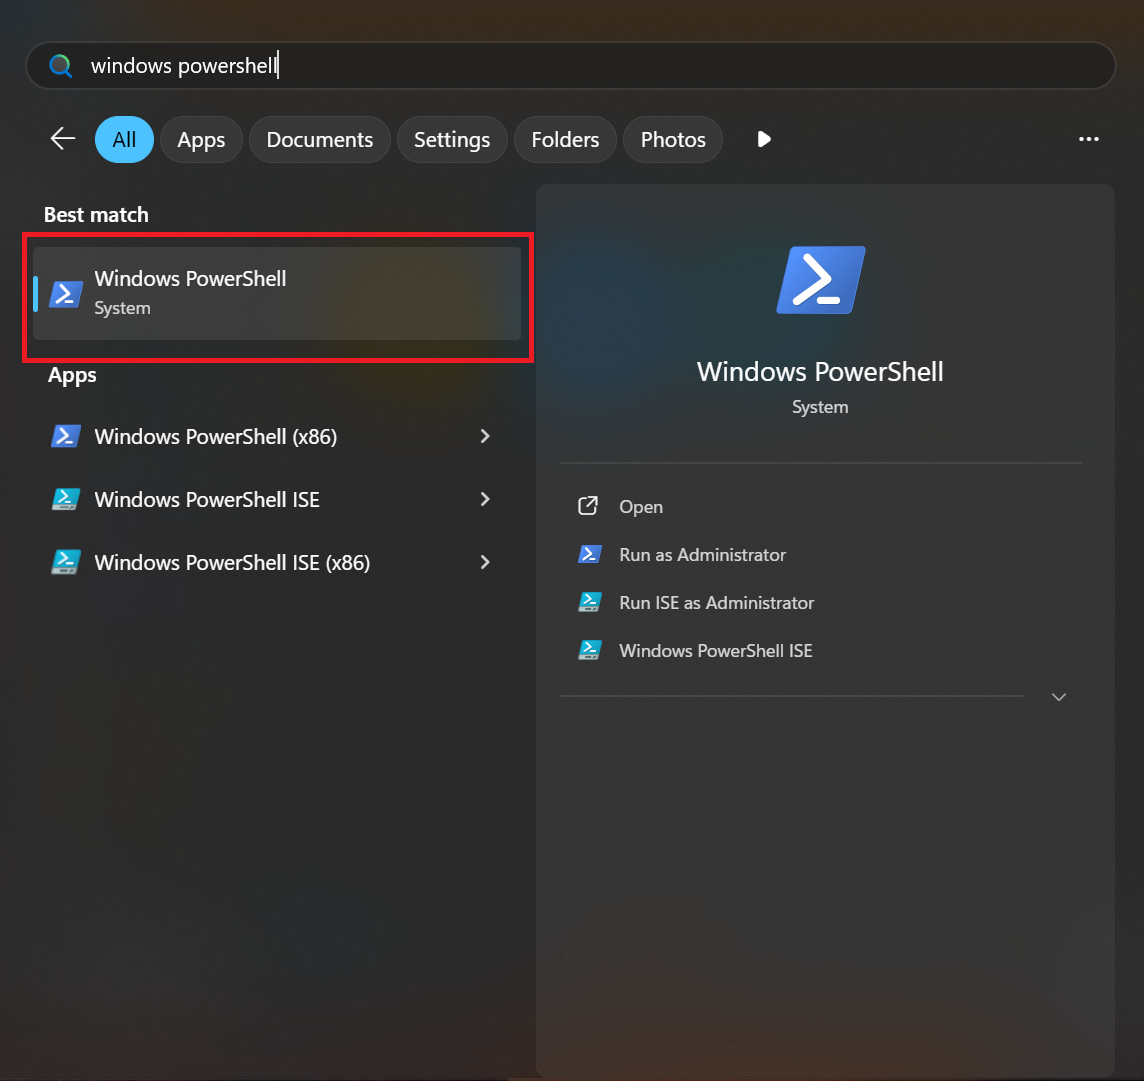
Opening a PowerShell terminal
To open a PowerShell terminal:
Open the Start menu by pressing on the ⊞ Win key.
Type in windows powershell.
Click on the highlighted area:
Prerequisites
Before proceeding, we’ll assume that you already have winget installed
on your system [2].
Note
If need be, you can substitute winget with another package manager
like Chocolatey [3]. In this case, you’ll have to make sure that all
of the required packages are installed before running the setup script.
You’ll also need to install a couple of additional packages by running:
winget install --id Git.Git python
Note
After installing python, please run python --version to make sure
that the PATH was updated accordingly and that the installed python
version is 3.10 or newer.
If the command doesn’t work, try closing the PowerShell terminal
and opening a new one to force a reload of the PATH variable.
Finally, we need to create a work directory in which the setup script will install the toolchain, clone the required repositories, etc. To do so, run [4]:
New-Item -Path "~\Desktop\" -Name "nxpcup_root" -Type "Directory"
cd ~\Desktop\nxpcup_root
Warning
Make sure that the work directory path does not contain any whitespaces,
otherwise the sample build step may fail. For instance, paths such as:
C:\Users\TEST USER\Desktop\nxpcup_root\frdm-imx93-for-nxpcup should be avoided.
As long as this constraint applies, you may place the work directory wherever you see fit. Additionally, you may choose to use a different name.
You are not allowed to change the location of the work directory after running the setup script, otherwise your packages won’t work properly.
Changing PowerShell’s execution policy
To protect users against running malicious code, PowerShell comes with a mechanism which prevents users from running scripts that don’t meet certain conditions. For more details, you can read this article.
Because of this protection mechanism, running the setup script might not work, which is why, before proceeding, we need to make sure that the policy is relaxed enough to allow us to execute our script.
To do so, you’ll have to:
Open up a
PowerShellterminal with administrator rights:
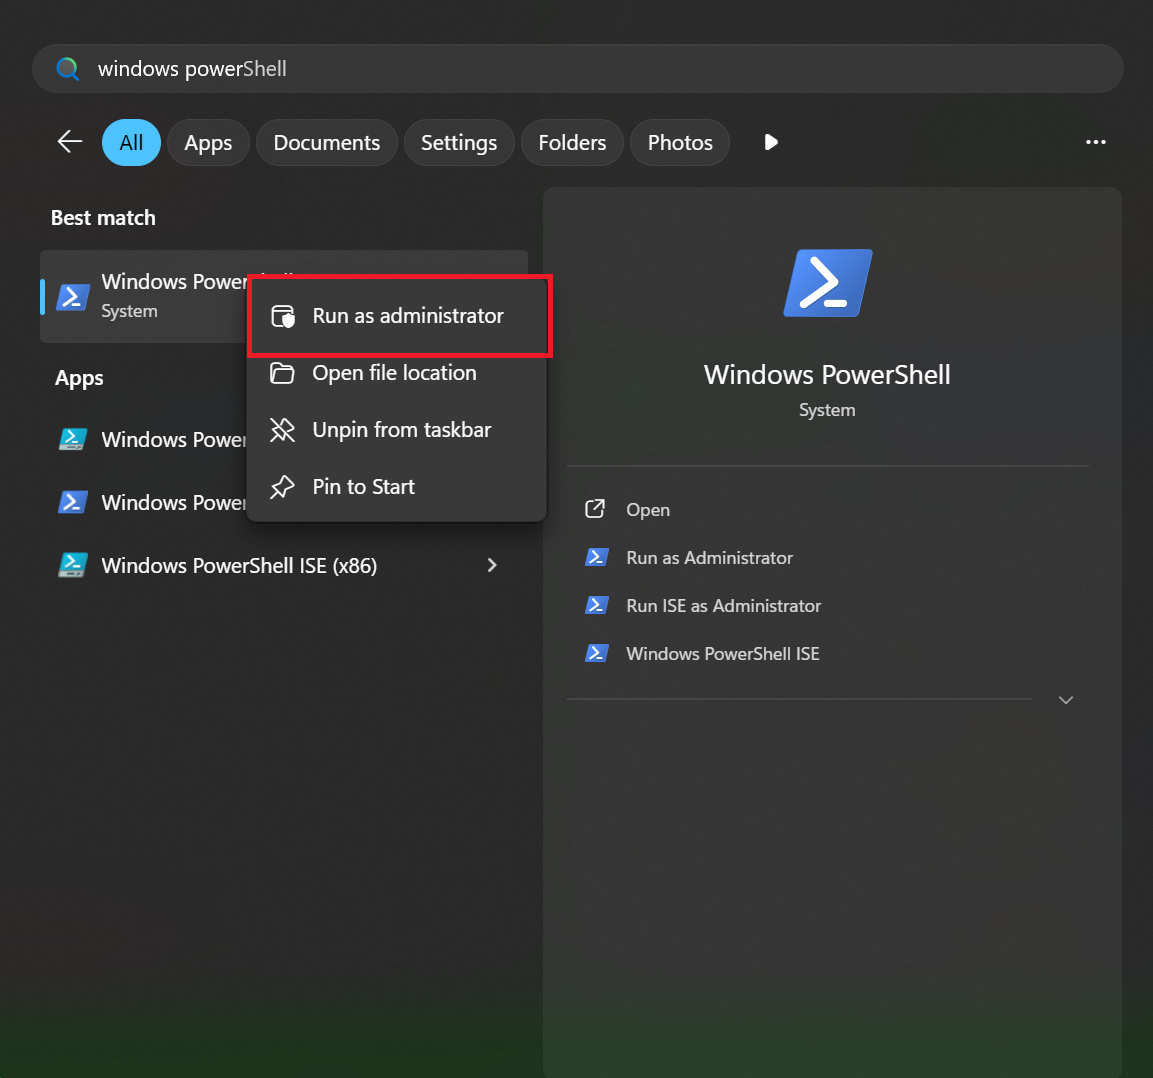
Run:
Set-ExecutionPolicy -ExecutionPolicy Unrestricted
Note
This command sets the execution policy for the LocalMachine scope,
which is why it requires admin rights.
You can also choose to set the execution policy for the CurrentUser
scope, which will remove the need for admin rights.
Note
After executing the command, PowerShell may ask you to acknowledge the change.
Note
You can choose whatever execution policy you see fit as long as it’s relaxed enough to allow the execution of the setup script.
To check if the policy was changed, you can run:
Get-ExecutionPolicy
which returns your effective execution policy.
Warning
The execution policy has multiple scopes (e.g. LocalMachine,
CurrentUser, etc.), some of which may take precedence over
the LocalMachine scope. Therefore, if the policy was not
changed after using Set-ExecutionPolicy, you’ll have to
make sure that scopes with higher precedence are not
currently using a more restrictive policy.
For more details, you can read this article.
Cloning the repository
To clone the project repository:
git clone https://github.com/NXPHoverGames/frdm-imx93-for-nxpcup.git
cd frdm-imx93-for-nxpcup
Warning
Please make sure you clone the project repository inside the work directory!
For information on the project structure, please see: The project structure.
Native development
The setup script
The script used for setting up the environment for native development
can be found under scripts\setup.ps1. The script has three
major functionalities:
Installing the additional packages required for building the application.
Downloading
uuu, which is the binary used to boot the board.Setting up the
westenvironment, which is required for building the application.
Warning
If you’re using a package manager that is not winget, you’ll have to
install the required packages before running the setup script. You can
find the list of required packages by opening the script and having a
look at the packages variable.
Note
Please make sure your current directory is ~\Desktop\nxpcup_root\frdm-imx93-for-nxpcup.
For PowerShell 5.1 users
Powershell 5.1 creates an alias for the wget Linux command,
defining it as Invoke-WebRequest. Because of this, trying to invoke
wget with the options you’d normally use on a Linux-based system will
fail since those options are not recognized by Invoke-WebRequest.
The setup script needs wget to download the toolchain and, therefore,
if the alias is not removed, it will not function properly.
To remove the alias in the current terminal session, you can run:
Remove-Item Alias:wget. This change, however, will not be persistent.
If you open a new terminal, you’ll notice that the alias is still defined.
To make the change persistent, run:notepad $PROFILE and then add
Remove-Item Alias:wget -ErrorAction SilentlyContinue to the file.
Once you’re done, close the current terminal and open a new one.
To check if the alias is defined, run: Get-Alias wget. If the alias
is not defined, the command will fail.
To run the setup script:
Remove-Item Alias:wget # for PowerShell 5.1 users, see notes above
.\scripts\setup.ps1
Note
During the script’s execution, you might be prompted to accept or deny the installation of certain packets.
Note
The repository update and toolchain installation steps may take a while.
Looking at the structure of the work directory (i.e. nxpcup_root), we can
see the following, newly created directories:
.
├── .west
├── modules
├── frdm-imx93-for-nxpcup
├── zephyr
└── zephyr-sdk-0.17.2
Their meaning is described below:
.west: result of the west initialization stepmodules: additional repositorieszephyr: source code of the Zephyr RTOSzephyr-sdk-0.17.2: toolchain directory
Additionally, two new directories have been created under ~\Desktop\nxpcup_root\frdm-imx93-for-nxpcup:
ENV and packages. Their meaning is described below:
ENV: result of the virtual environment creationpackages: contains the packages installed during setup
Finally, the downloaded uuu binary will be placed under boot\uuu.exe.
Uninstalling packages
Warning
DO NOT manually delete the packages under packages otherwise
you risk messing up your PATH variable. These will be automatically
removed if you use one of the uninstall methods specified below.
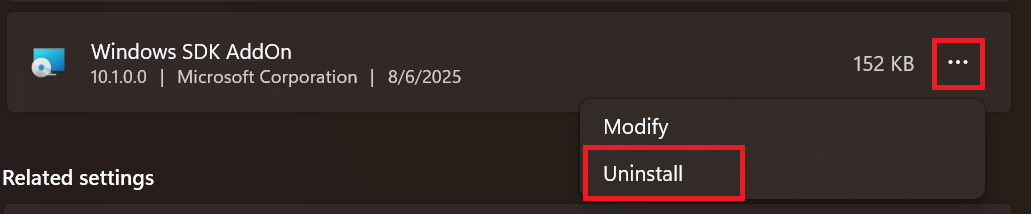
Once you’re permanently done with the development, you may want to delete all of the previously installed packages. To do so, you can either:
winget uninstall --id <package_name>
or:
Go to
Apps > Installed apps.Find the application you want to delete.
Click on
...and thenUninstall:
Building the hello_world sample
To check if the development environment was properly initialized, you can
build the hello_world sample application. Before doing so, however, you’ll
have to activate the python virtual environment by running:
.\ENV\Scripts\Activate.ps1
Note
The setup script also activates the python virtual environment, which is why you don’t need to activate it after running the script.
Warning
Please remember to activate the python virtual environment every time you open a new terminal session. This step needs to be performed before you build your application.
Now, build the hello_world application by running:
west build -p -b frdm_imx93//a55 samples\hello_world
Summary
Below you may find a summary of the steps required for initializing the environment for native development:
Create the work directory:
New-Item -Path "~\Desktop\" -Name "nxpcup_root" -Type "Directory"
cd ~\Desktop\nxpcup_root
Clone the repository:
git clone https://github.com/NXPHoverGames/frdm-imx93-for-nxpcup.git
cd frdm-imx93-for-nxpcup
Remove alias for the
wgetcommand:
Remove-Item Alias:wget # for PowerShell 5.1 users, see notes above
Run the
setup.ps1script:
.\scripts\setup.ps1
Activate the python virtual environment:
.\ENV\Scripts\Activate.ps1
Build the
hello_worldapplication:
west build -p -b frdm_imx93//a55 samples\hello_world
The west command
For more details on the west command see The west command.